Dr. A.K. Williams, Ph.D
San Pedro, Costa Rica
| Introduction | ||||||||||||||||||||||||||||||||||||||||||||||||||||||||||||||||||||||||||||||||||||
|
I know this website is getting a little confused. Why didn’t I put this page on the same one with the other assay page? Well, it’s your fault. Es culpa de ustedes! I never dreamed you wanted to know this much about chemistry. Every time I put up a sort of simplified method of doing something you SLAM me with requests for more info, more methods. I’m proud o ya! I’m going to try my damndest to keep giving it to you until you guys yell "STOP" or I run out of anything more to write. On this page we are going to talk about quantitative determination of gold and how you can do it in the basement or, if you are so inclined, out in the field. No you ain’t gonna have to buy a muffle furnace or a $2500 analytical balance to do it. What do I keep telling you about that cat? If someone can catch him, we can skin him! He has been caught. The methods I am going to give you are not necessarily mine, they are in the literature. However, if you had to hunt for it in the library you would have no need of this website or me and you also would not have enough time left over to ever dig a gram of gold out of your favorite site. I got nothing better to do so, you dig, and I’ll tell you how to assay your ores. All you have to do is spend a little time on a rainy/cold day to surf through the accumulated knowledge of all the ages as it applies to metallurgy/chemistry of gold and the other precious metals.
|
||||||||||||||||||||||||||||||||||||||||||||||||||||||||||||||||||||||||||||||||||||
| The Basics | ||||||||||||||||||||||||||||||||||||||||||||||||||||||||||||||||||||||||||||||||||||
|
I told you on the previous "assaying" page that there were different kinds of assays. I explained the difference between qualitative and quantitative assays. As Emeril would say, we’re gonna "kick it up a notch". We are only going to consider quantitative assays. However, there are different classes of quantitative assays. Just ain’t no end to this, is there? If you want to measure something you must have some method of "quantitating" it. You might use a ruler, a bathroom scale, an analytical balance, a basket, a box, a tablespoon or some other method for determining just how much of the stuff in question that you have. We are going to do some exploring. This is going to make the Lewis/Clarke explorations look Boy Scouts on a weekend outing. We can, as in a fire assay, described on the other assay page, weigh the final sample. This is called a "gravimetric" assay. Why? Well, it’s determined on its relation to the earth’s gravity. Gravimetric, pull of earth’s gravity, metro, to measure, you get it, I know you do. I told you that you could use an Atomic Absorption Spectrometer to measure the gold in an Aqua Regia assay. This would be a spectrometric assay. It measures the emission of electromagnetic radiation from the plasmolized sample. Spectro, spectrum, metro, measure, - - - . This could go on and on but let’s get to the one we are interested in on this page. Another means of measuring something is by what color it is. This could also be called spectrometric, but if you are measuring anything in the electromagnetic spectrum that happens to fall within the range that we can see with our eyeballs, it is called "colorimetric". Color, something we can see, something we can measure with our eyes, green, red, blue, metric, to measure, etc. I happen to know that an object or solution that is reflecting light that falls between about 600-700 millimicrons on the electromagnetic spectrum will appear red to us. If it reflects light in the range around 400 millimicrons it will appear to us as blue. That is just the color, not the intensity of the color. The intensity is dependent upon how much light is being reflected. Don’t worry, you don’t have to remember all this. I ain’t interested you memorizing stuff. I’m trying to explain it so you understand it. That is much more important. No pop quiz’s today! About here, I suggest a trip to the fridge, lay back, stare at the ceiling, and see if there is anything you understand so far. If not, not to worry, we are getting there and eventually (I hope), it will all come together. From here on, we are going hypersonic. We are gonna bodysurf on thermonuclear shock waves of information! I happen to know that there are certain chemicals that will react with salts of gold to produce colored solutions. O.K., that’s a qualitative assay, right? The solution turns red; there is gold in it. But this page was supposed to be about quantitative assays. How much gold is in it? That’s what we are interested in. Hang with me. I’m gonna tell you how to turn a qualitative assay into a quantitative assay. It ain’t all that difficult. It’s just a matter of, once you get the right color, you have to determine how intense the color is. Right? Stare at the ceiling again, another trip to the fridge? Think about it a little. At this point I really want you understand what I’ve been trying to get across. I want it to make sense to you. Hey gang, I know this is a little confusing. Maybe it’s my fault! Maybe I just can’t explain it in terms that anyone can understand but if there is one of you that get the idea, it’s worth it. Now, we are going to convert our qualitative assay to a quantitative assay. We are not going into details at this time. I just want to explain how these assays work so that you will understand what you are doing when we get to the detailed real thing. I told you that there was a chemical that, when mixed with a salt of gold would give a red color. Actually, there are several chemicals we could use to give a color when complexed with gold. Suffice it to say that the chemical we have will produce a red color when it reacts with gold that is in solution (dissolved). In order to make this work we must have a "standard" to compare everything to. So, we make a "standard gold solution". This will be made once and kept for a long time to come. Say that we want a solution of gold chloride that contains exactly 10 micrograms of gold/ ml (cc). OK, I know we can’t weigh out 10 micrograms. We wouldn’t do it that way in a lab either. Too much probability of error. We would weigh out 100,000 micrograms. That’s a lot easier and the error is much smaller. So, what we would do is to take 0.1 grams of gold, dissolve it in Aqua Regia, go through the procedure and end up with 0.1 gr of gold dissolved in a little HCl. Now we add water to a volume of exactly 100 ml. Our solution now contains exactly 0.1 gr gold/100 ml or 0.001 gr/ml (1milligram/ml). Now with this standard we can make whatever strength of solution that we want. We can simply dilute it 1/10 with water and make a standard of 0.01 mg/ml, etc. Now do you guys see why I refuse to use the English system of weights and measures? What if you had to do this in ounces, pounds, pennyweights, etc. You would be a basket case in about 4 microseconds. This is the place where we take a little "descanso", go to the fridge again for some of that "aid to deep thinking". Kick back and consider all the problems of the world, what we will do about them, and try to see what I am getting at In any case, we now have a "standard gold solution" that we can use for the next five years. We must also have a solution of "chemical X" that produces the red color when it reacts with gold. We probably need some other solutions of chemicals to prevent interference from other metals such as Tellurium and Selenium. No big deal! You only have to make them once.
|
||||||||||||||||||||||||||||||||||||||||||||||||||||||||||||||||||||||||||||||||||||
| Beer’s Law | ||||||||||||||||||||||||||||||||||||||||||||||||||||||||||||||||||||||||||||||||||||
|
I think we should take a short excursion into an area that is much more than you ever wanted to know. Beer’s law? Does that have something to do with going to the fridge? Beer’s law says that whenever the brain cells are getting overheated, you should go to the fridge for a ----.?? Actually, Beer said that if you have a series of reactions that produce a color or other measurable characteristic you can have as many points (tubes) as you want. They can range from 1 unit to an infinite number of units. In other words, you can set up an assay in test tubes with the first one having 1 microgram of gold to the 100,000th tube that has all the gold in the world in it. He also states that the color (or other characteristic) will not be linear over the entire range of the test. That is, if one mg of gold in the test produces a color of intensity 1, 10 mg of gold might only produce an intensity of, not 10, but only 7. He further states that if you limit the range of your test severely, ie maybe only from 5 to 50 mg, the intensity of the color produced by the test will appear, for all practical purposes, to be linear. That is 5mg of gold will produce a color 5 times as intense as 1 mg, or twice the intensity of 2.5 mg, etc. The only reason I mention this is that it is the basis for all colorimetric and spectrometric assays. You can’t stretch these assays beyond certain limits or you will get erroneous results. GIGO! If you run one of these assays and, for example, your sample is more intense than the highest concentration tube in your series, you will have to run again using a diluted unknown. I am absolutely certain that I am an astronaut now. Why, because I feel like I’m way out there, floating around in space with no one within 100,000 miles of me. I never said it was all gonna be simple, I just said you can understand it/do it, if you really want to. Remember the greatest truism in the entire universe, THERE AIN’T NO FREE LUNCHES!!
|
||||||||||||||||||||||||||||||||||||||||||||||||||||||||||||||||||||||||||||||||||||
| A Little More than Basics | ||||||||||||||||||||||||||||||||||||||||||||||||||||||||||||||||||||||||||||||||||||
|
You will need a "test tube rack". This can be bought or made from hardware cloth from the local hardware store. Just something that will hold test tubes in an upright position. If you make one, make it so that you will have 11 tubes in a row and 5 rows. There is a reason for this that we will get to later. I am giving you the real world info here. Not theoretical, not what I think it will be like. This is the way it is done in real life. You will need a couple of "pipettes". These are simply graduated glass or plastic tubes with a restricted end. They give you a way to measure liquids VERY accurately. You simply suck the liquid into the pipette, let it flow out to the "zero" mark and then put as much liquid as required into the test tube. I’ll go into this in more detail later. OOOOK! This is CHEMISTRY. We are DOING it now! Never thought you would ever be even Considering doing something like this, did you? Well, here you are, and I’m damned proud of you! You can do the same job as the assay lab you have been using for a hell of a lot less $$$. What does an assay cost in US now? I have no idea, but I bet it ain’t cheap. Set up 10 test tubes in your rack. Now if you add enough of your standard gold solution to the tubes so that you have 0.1 microgram in the first, 0.2 in the second, 0.3 in the third, etc. You now add the other chemicals and you will now have 10 tubes containing gold and they will be a darker red as the gold concentration increases. The first will be just a little weak reddish, the second a bit stronger, the last one will be a real dark red. Now if you take, for example, 1 gr of ore, concentrate, or other and you put the gold in solution with Aqua Regia. Now use a measured quantity of this instead of the gold standard solution you will get some red color depending on how much gold it has in it. Right? Now what you do is to take the tube of unknown (your ore sample) and compare it, by eyeball, to the ten tubes of standard gold concentration. You will find that you will have no trouble finding the standard tube that has a color closest to the unknown tube from your ore. If the color most closely matches the color in standard tube number 6, then it has just about the same amount of gold as that tube. If, in this example, # 6 tube had 0.6 micrograms, then your sample had 0.6 micrograms. If you used 10 gr of sample to extract the gold, then your 10 gr sample had 0.6 micrograms of gold in it. If you had 0.6 micrograms/10 gr sample then your ore has 60 mg/metric ton (1,000 kg). Near nothing, better look somewhere else. However, if your sample was only 1 gr of ore and the readings were as above, your ore would have 600 mg (0.6 gr)/metric ton. Try to do this with the English system. I guarantee you will be reduced to a babbling idiot before you arrive at a number that means anything. STAY IN METRICS!! At this point I really want you to kick back, relax, think about it, read it again, whatever. I want you to grasp the idea of what we are doing here. We are constructing a series of colors that are of known concentration and comparing our sample (the unknown) to them. This might seem very complex but think about it, It’s not that difficult and it can save you some pretty big bucks in assay costs. I’m gonna tell you exactly how to do it but first, I want you to understand why you are doing it this way and how the system works. Merlin died, no magic since. This is just pretty good chemistry that YOU can do in your basement OR out in the field. You see what we have done here is a "titration" of the amount of gold in each tube. You should know about titration. If not, go to the page on "Determination of free cyanide". Even if you have no interest in cyanide you should read it so that you understand titration. On that page I talked about "end point". In this case the "end point" is the intensity of the red color obtained by a known amount of gold. I’m sure that I don’t have to tell you that along with these "known" tubes you also run one tube, the "unknown", that contains the gold from your ore/concentrates. This sample will be an aqua regia extract, an iodine extract, whatever, from your unknown sample. The final sample should be in a hydrochloric acid solution. You simply treat this sample exactly the same way that you did the "knowns". Now you compare the unknown to the standard series to find a tube that is closest to the color in your sample tube. Now you know pretty close to how much gold is in your unknown. This stuff is a little difficult to explain. If you extract the gold into aqua Regia you must get rid of the nitric acid by evaporation to near dryness, add some more hydrochloric and evaporate again. This residue should then be diluted with hydrochloric acid diluted about 1/6 with water. You must dilute this residue to a known volume, 10 ml, 100 ml, etc. If you don’t, how the hell are you ever going to do the arithmetic to find out how much gold you have? You must always know exactly what you started with and how much volume of liquid it is contained in. THIS IS VERY IMPORTANT! You use the same procedure if you extracted your sample with, for example, bromine. You add some hydrochloric, evaporate to near dryness, add some more hydrochloric and repeat. Your final sample for assay should/must be in HCl solution. At this point I must also mention that there are other metals out there that could be in your sample. Such things as selenium, mercury, etc. These metals, if present, will also give a color in this assay. They can interfere with your assay and will assay exactly like gold. If you have this stuff in your ore you will have to get rid of these metals before you assay for the gold. I’m gonna tell you how to do it. Don’t I always! I mentioned before on another page that there is another metal that has many characteristics in common with gold. That metal is Tellurium. This ain’t the most common metal in the world. In fact, all my life in laboratories I can not remember ever having occasion to use Tellurium until I got into metallurgy. What we will have to do, if we have interfering metals is to add some Tellurium as a salt, say tellurium oxide or somesuch. Now what we do is to precipitate the gold and tellurium and leave the interfering metals in solution. Why do we need the tellurium? It is acting as a "collector". Usually your gold is in such small amounts here that if you precipitated only the gold you probably would not be able to find/recover it. The Tellurium acts exactly like the lead in fire assay. It amalgamates with the gold and provides "bulk" so that you don’t lose it. Now you can put the gold/tellurium back in solution with a little Aqua Regia, make it up to a known volume and you are ready to proceed with the assay. If you must go through this pre-cleaning procedure, here’s how you do it. Take your sample in HCl and dilute it up to about 50 ml with water. You will need a solution of Tellurium oxide. About 0.1% dissolved in 1 normal (1/12) HCl. Add 0.2 ml of the Tellurium solution to the gold solution. Nothing happens. Now you must have another solution, Stannous (tin) Chloride. This solution should be 10% in water. Add 2 ml of this solution. Now gently boil the reaction about 5-10 minutes. You should now have a brown precipitate in the solution. This is the gold/tellurium. You can filter it, or you can let it settle, pour off the clear liquid, wash once with 1N (1/12) HCL, then dissolve it in a small amount of Aqua Regia and treat as above. Remember that you only have to do this if you have interfering metals. If you are working a quartz vein, you won’t need to do this. If you are assaying concentrates or electronic scrap you probably won’t need it. Just so you know if you have to. Now, we have our gold from the sample in HCl solution and we are ready to find out how much is in it. Let me say here that there are lots of chemicals that have been used to produce a color with salts of gold. I’m going to give you one that I have had some experience with. It is a chemical called "Rhodamine B". Like the other chemicals mentioned here you will have to get them from a scientific supply company. Sorry, these you won’t find at the drugstore.
|
||||||||||||||||||||||||||||||||||||||||||||||||||||||||||||||||||||||||||||||||||||
| The Guts of the Thing | ||||||||||||||||||||||||||||||||||||||||||||||||||||||||||||||||||||||||||||||||||||
|
Lets start here by giving you a list of the things and chemicals that you will need.
Yeah, I know it’s a little intimidating. You will have to get it from a scientific supply company. The only one that is a little pricey is the Rhodamine. Buy the least amount that you can. A little goes a long way. Maybe, if you have a university or college close by, you could con the chem dept out of a little Rhodamine and maybe the others too. That’s what I did! The range of this assay will be from 1 – 10 micrograms. Yeah, that’s 1 - 10 millionths of a gram. Hey, we ain’t playing now! We are into real assay chemistry.
|
||||||||||||||||||||||||||||||||||||||||||||||||||||||||||||||||||||||||||||||||||||
|
Making the gold Standard Solution |
||||||||||||||||||||||||||||||||||||||||||||||||||||||||||||||||||||||||||||||||||||
|
Well our standard solution of gold is going to contain exactly 10 micrograms of gold/ml. I know you can’t weigh gold at that level. Hell, I would have trouble doing that in a hi-tech laboratory. That ain’t the way it’s done. The way we do this makes it a lot easier, less error, and more reliable. We are going to make two solutions of gold. One we will call our "stock" solution. The other we will call our "standard" solution. OK? Call them whatever you want. First thing you must do is to accurately weigh out 1 gram of gold. Pure gold. Not 14 carat or somesuch. Dissolve this gold in Aqua Regia; go through the evaporation with HCl at least twice. Dilute the residue containing the gold chloride with 1 N (1/12) HCl to exactly 1,000 ml. This stock solution now has exactly 1 gr of gold in 1000 ml or 1 mg/ml. This is about 100 times more than we want. So, now I want you to take a pipette and take exactly one ml and dilute it to exactly 100 ml with 1N HCl. This will be our working standard. It contains 10 micrograms of gold/ml. Stopper these solutions well and keep them. You will be using them for a long time. O.K., I’m sure its time for Beer’s law to be invoked. Go to the fridge, etc, etc. Ain’t no completely sober basement chemist that can grasp all of this at one sitting.
|
||||||||||||||||||||||||||||||||||||||||||||||||||||||||||||||||||||||||||||||||||||
|
The Assay |
||||||||||||||||||||||||||||||||||||||||||||||||||||||||||||||||||||||||||||||||||||
|
First thing you must do is to make a chart. I know you think you can remember it all but please do it this way. This is the way the pros do it and you ain’t likely to improve on it.
|
||||||||||||||||||||||||||||||||||||||||||||||||||||||||||||||||||||||||||||||||||||
All volumes in milliliters (ml) The last tube is for the unknown sample, any amount up to 7.5 ml.
|
||||||||||||||||||||||||||||||||||||||||||||||||||||||||||||||||||||||||||||||||||||
|
I have to say here that I do not like this protocol. It’s not mine, I got it from somewhere in the literature. Offhand I do not recall who devised this assay but I can tell you a little about him. He was an inorganic chemist. Why? Because inorganic chemists love to use large reaction mixtures. They hate to try to measure anything less than 10 ml. A biochemist on the other hand hates to try to measure any amount more than 5 ml. The difference is that chemists rarely learn to use a pipette. They prefer to measure in graduated cylinders etc. However, this is a perfectly good assay and the large volume will probably be easier for you to deal with until you get the hang of using a pipette. To get on with the assay, set up your test tubes in a row. Now go to the first horizontal line on the chart to see how much of what to add to each tube. Make the additions, and then drop down to the second line, etc. After you add the ether, take a piece plastic or a stopper to seal the test tube mouths and shake it 25 times. Put it back in the rack and go to the next. When all the tubes have been shaken you will note that the ether layer is now floating on the water layer. Also the ether (or benzene) will have a reddish/blue color. That’s what you are looking for. Your # 1 tube should be weakly colored and the color intensity should get progressively darker as you go to the tenth tube. The eleventh tube is your sample. Now simply compare the color in the sample tube to the others and select the tube that most closely matches that of the sample. Now you know very close to how much gold is in the sample because you have matched it to a reaction with a known amount of gold. Now you will have to a little simple arithmetic to calculate the gold in your original ore sample.
|
||||||||||||||||||||||||||||||||||||||||||||||||||||||||||||||||||||||||||||||||||||
|
How to Use a Pipette |
||||||||||||||||||||||||||||||||||||||||||||||||||||||||||||||||||||||||||||||||||||
|
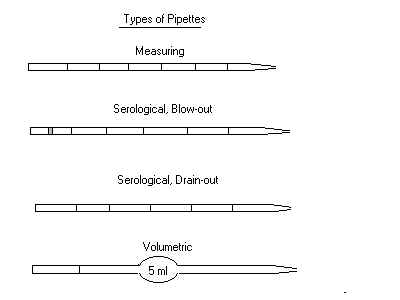
Why should you want to know how to use a pipette when you probably don’t even know what a pipette is? Well, I think you will find that a few pipettes around the Basement will be a tool that you will learn to use a lot. They are very convenient and useful tools for accurately measuring any liquid. So what are they anyway? As usual, its not as simple as saying "it’s a glass tube". Actually there are three types of pipettes that are of interest to us. First is one called a "measuring pipette". All these pipettes come in sizes from 0.1 ml to as large as 25 ml. Lets use a 5 ml for example. This thing is, in effect, a glass or plastic tube with the tip restricted and graduation marks at, usually, 0.1 ml increments with 0 at the top end and 5.0ml at the bottom. This type has an etched line near the bottom end that will be marked 5.0ml. If you fill the pipette to the 0 mark and then allow the liquid to drain out until it reaches the 5ml mark you will have pipetted exactly 5.0ml. That’s right, accurate to at least 0.1ml. The next type is called a "serological" pipette. At first glance it appears exactly like the measuring pipette, however, upon closer inspection, you will note that it is graduated all the way to the tip. There are two main types of these. If you look at the top of the pipette you will probably find an etched ring. If so, you have a "blowout" pipette. If you want to put entire 5 ml into a flask you will have to blow the last drop out. If you don’t see the etched ring at the top it is a "drain out" pipette. With this type you must simply touch the tip to the side of the flask to allow the last drop to flow out. Don’t try to cheat, that is the way they are calibrated. The third type is called a "volumetric" pipette. This type has no intermediate calibrations. If it is a 5ml, you can only measure 5 ml. You cannot measure 4.4ml, for example. These are not as generally useful as the first two. They are easily recognized by the fact that it has a "bulb" or bulged section in the glass stem. There are many other types of pipettes designed for special purposes. For example a "milk pipette" is, for example, calibrated at 1ml and at 1.1ml. nowhere else. A "lamda" pipette is a volumetric type but it can accurately deliver volumes of as little as 1.0 microliter. That’s right, 1/1,000,000 of a liter. Anyway, you get the idea. In case I lost a few of you, the drawings below should help visualize what I am talking about;
|
||||||||||||||||||||||||||||||||||||||||||||||||||||||||||||||||||||||||||||||||||||
|
|
||||||||||||||||||||||||||||||||||||||||||||||||||||||||||||||||||||||||||||||||||||
|
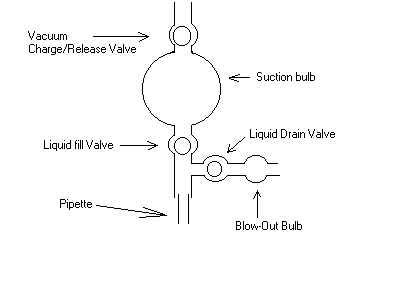
Yeah, I know, I’m no artist. Can’t sing either! But, I do know how to use a pipette. Used them probably 200 times a day for 30 years. So what’s the big deal about pipettes? You just suck up some liquid, drain it out to the zero mark, and then drain out as much as you want, right? Absolutely right! The question is, can you do it? I know, I know, of course you can. Would you trust yourself to suck up some sulfuric acid or cyanide without getting a mouthful? I might do it in a pinch but I’ve pipetted about 10-20 million times more than you have. And, even for me it ain’t a good idea. Fine, if you are dealing with water, salt solution, alcohol, etc, if you get a snoot full it’s no big deal but with nitric acid, aqua regia etc, it could be a big deal. I guess we gotta skin that cat too. I am the nightmare of all cats in the world! Fortunately for us some enterprising folks have devised "safety pipettors". There are numerous designs of these devises but there is one that for our purposes seems to be the most practical and economical. It’s sort of hard to describe but it is basically a rubber bulb attached to the end of the pipette that does the sucking for you. It has three little "squeeze valves" on it. Three valves? Sounds complicated, but it’s not. Since I can’t describe it very well, I’ll make another of my computer enhanced, Michelangelo quality drawings. Hang on to this. In a hundred years it will be worth millions! |
||||||||||||||||||||||||||||||||||||||||||||||||||||||||||||||||||||||||||||||||||||
|
|
||||||||||||||||||||||||||||||||||||||||||||||||||||||||||||||||||||||||||||||||||||
|
So, how do we run this hi-tech device? I know you are all waiting with your tongues hanging out for me to tell you. Well, you simply stick the pipette in the bottom end as indicated. Now you squeeze the top valve and also squeeze the bulb to create suction in the bulb. Release the valve and you have trapped some energy as vacuum in the bulb. Now you put the end of the pipette in the liquid that you want to measure/transfer and squeeze the second valve, the one in direct line top to bottom, just below the bulb. You will find that the liquid will start to rise in the pipette in a very ‘controlled" manner. Let the liquid rise to above the 0 mark on the pipette. Now you switch to the 3rd valve, the one off to the side. Squeeze it gently and you will find that the liquid will start to slowly drain from the pipette. When it gets to exactly 0, release the valve. Now you can stick the pipette in whatever vessel you choose, squeeze the side valve again and deposit whatever amount you want into the receiving vessel. If you are using a "blowout pipette you have to blow out the last drop, right? To do this simply put one finger over the end of the side-valve and squeeze the valve. It will blow out the last drop. Now you know all there is to know about pipetting, right? No, you can’t get off that easy. Forget the safety pipettor for a moment. You will definitely not want to use this device all the time, so you must learn to pipette by mouth also. There is only one trick you must know to accomplish this. If no one ever tells you how, you might spend the rest of your life trying to pipette by mouth. I am going to divulge this secret to you at absolutely no cost, not even postage and handling. I’m a super-nice guy, ain’t I. If I should hand you a pipette and a beaker of water and say "transfer 2.6 ml into this test tube"; I can tell you exactly how you are going to try to do it. O.K., there might be 5% of you who would get it right the first time. The first thing you will do is to grasp the pipette in your hand with four fingers, pinky to index, holding it. You will suck up some water, then simply put your thumb over the top end of the pipette to keep the water from escaping. Now you will try to relieve a little pressure on your thumb and let the water flow out of the pipette. This is the way everyone try’s to do it! Fact is, It ain’t gonna work! If there is anyone out there in the whole world that can do it that way, I’ll pay your airfare and hotel bill to come to CR and show me. If you can’t do it, I don’t pay. So, if we can’t do it that way how the hell do we do it? Well, we do it like the pro’s. Standard chemists can’t do this. Only microbiologists and biochemists. Get a pipette or just a small diameter piece of tubing; grasp it with your pinky, index, and middle finger on one side and your thumb on the other. That ain’t hard but I’ll bet you it’s not the way you really want to do it. That leaves your index finger free to cap the top of the pipette. THAT IS THE WAY YOU DO IT! Practice this for an hour and you will find that you can control the liquid to at least 0.1 ml. I can control it to 0.01 ml, but I’ve had lots of practice. Try it with your thumb too. Just to see if you can get a free trip to Costa Rica off me. If you depend on your thumb, I don’t think you will ever see the beautiful "Rich Coast". There are many other methods to do colorimetric assays of gold. In fact you can simply dissolve gold in an HCl solution, add tin (stannous chloride) and the gold will precipitate as a colloid of purple gold particles (purple of Cassius). This has been used for thousands of years to assay gold. I will find a method or devise my own and post it ASAP. Right now my plate is pretty full so I have to post what I can and hope that it helps a little. |
||||||||||||||||||||||||||||||||||||||||||||||||||||||||||||||||||||||||||||||||||||
|
Ain’t all this stuff Fun!!! |
||||||||||||||||||||||||||||||||||||||||||||||||||||||||||||||||||||||||||||||||||||